深色模式
Flutter 的三棵树
三棵树的简单概念
以下内容取自Flutter官方文档。
假设有一段Widget组件成的简单代码:
dart
Container(
  color: Colors.blue,
  child: Row(
    children: [
      Image.network('https://www.example.com/1.png'),
      const Text('A'),
    ],
  ),
);那么它在运行时,会生成一棵Widget树。
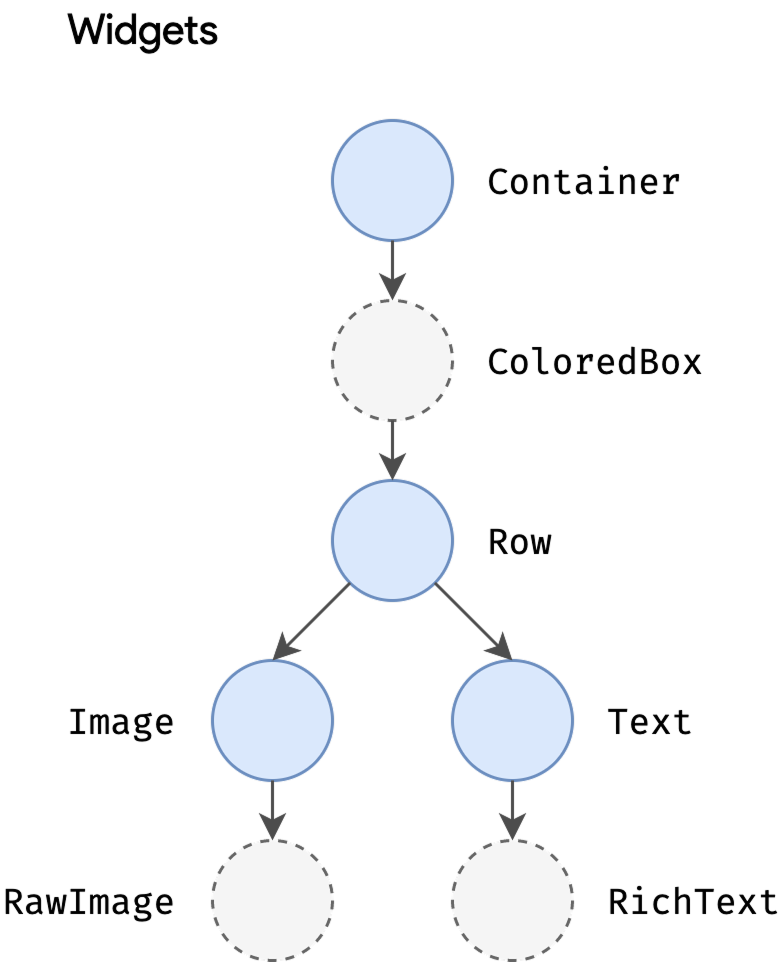
注意,Widget树与代码里的Widget嵌套结构是有区别的,比如上图中,Widget中的Container下面多了一个ColoredBox。
Widget树会生成Element树,元素是1:1对应的关系
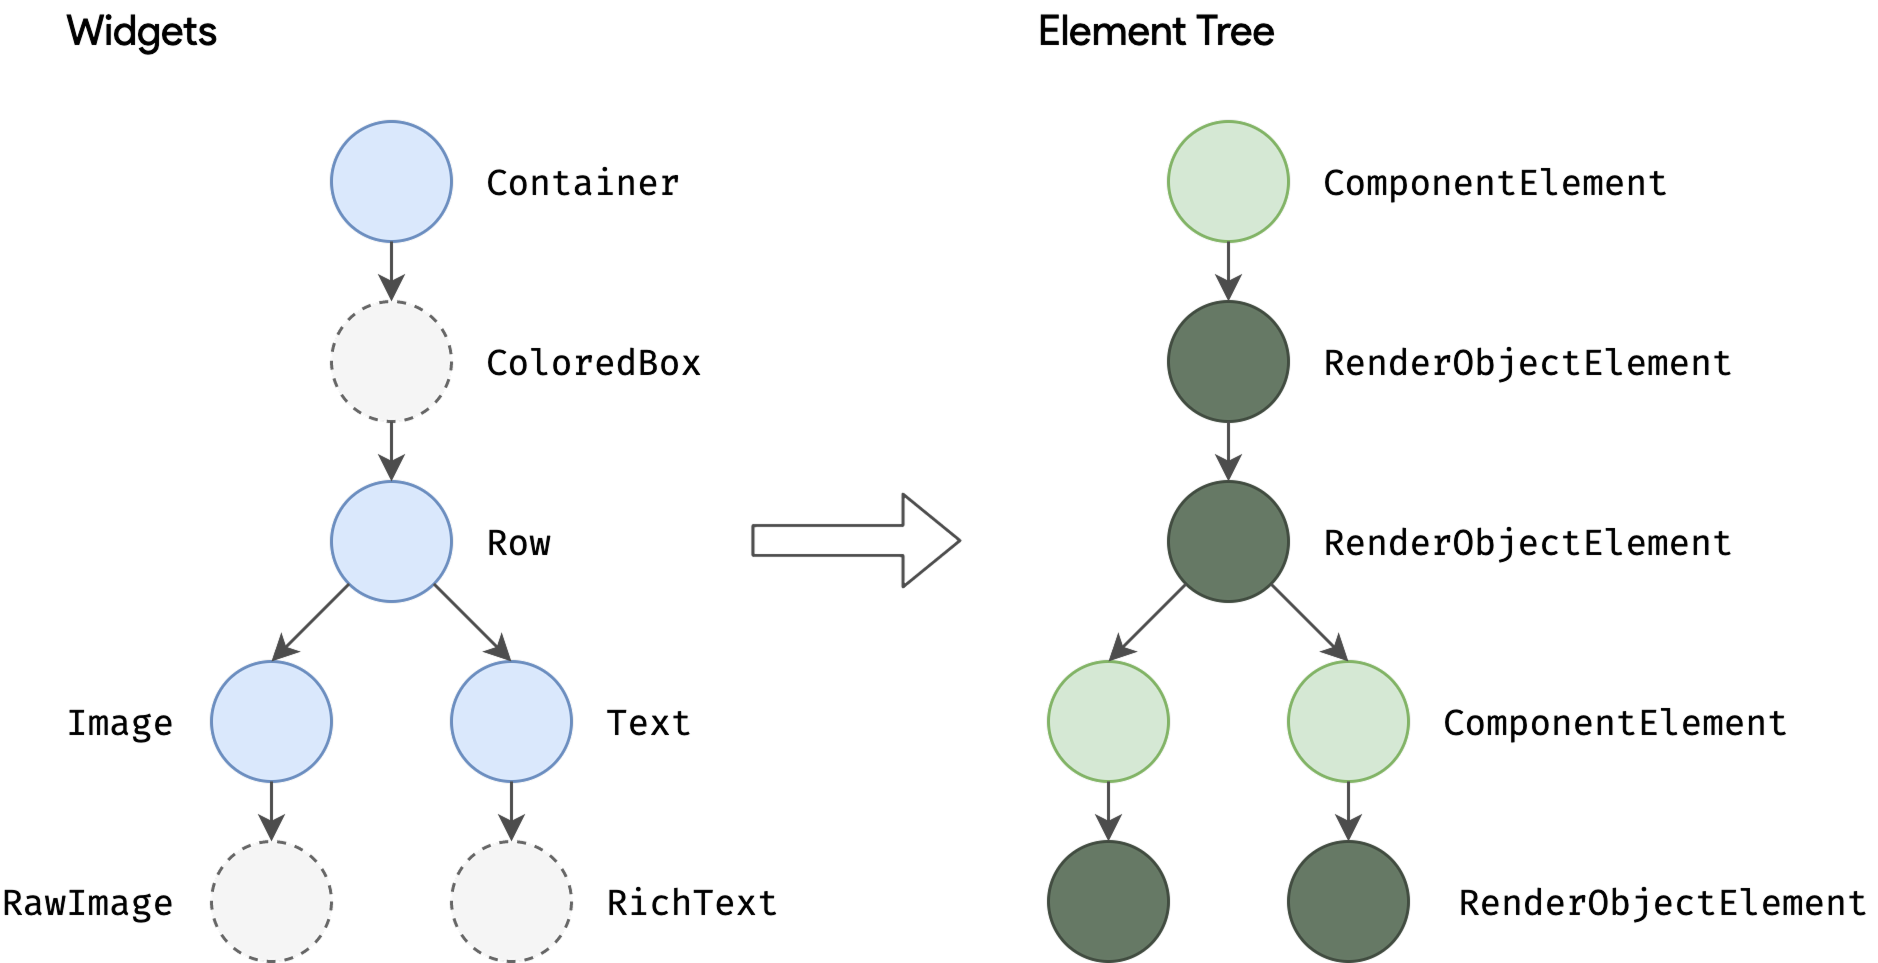
注意,Container生成的Element是StatelessElement,它是ComponentElement的子类,图中只取ComponentElement与RenderObjectElement是为了展示它们与Render树的关系
Element树会生成Render树
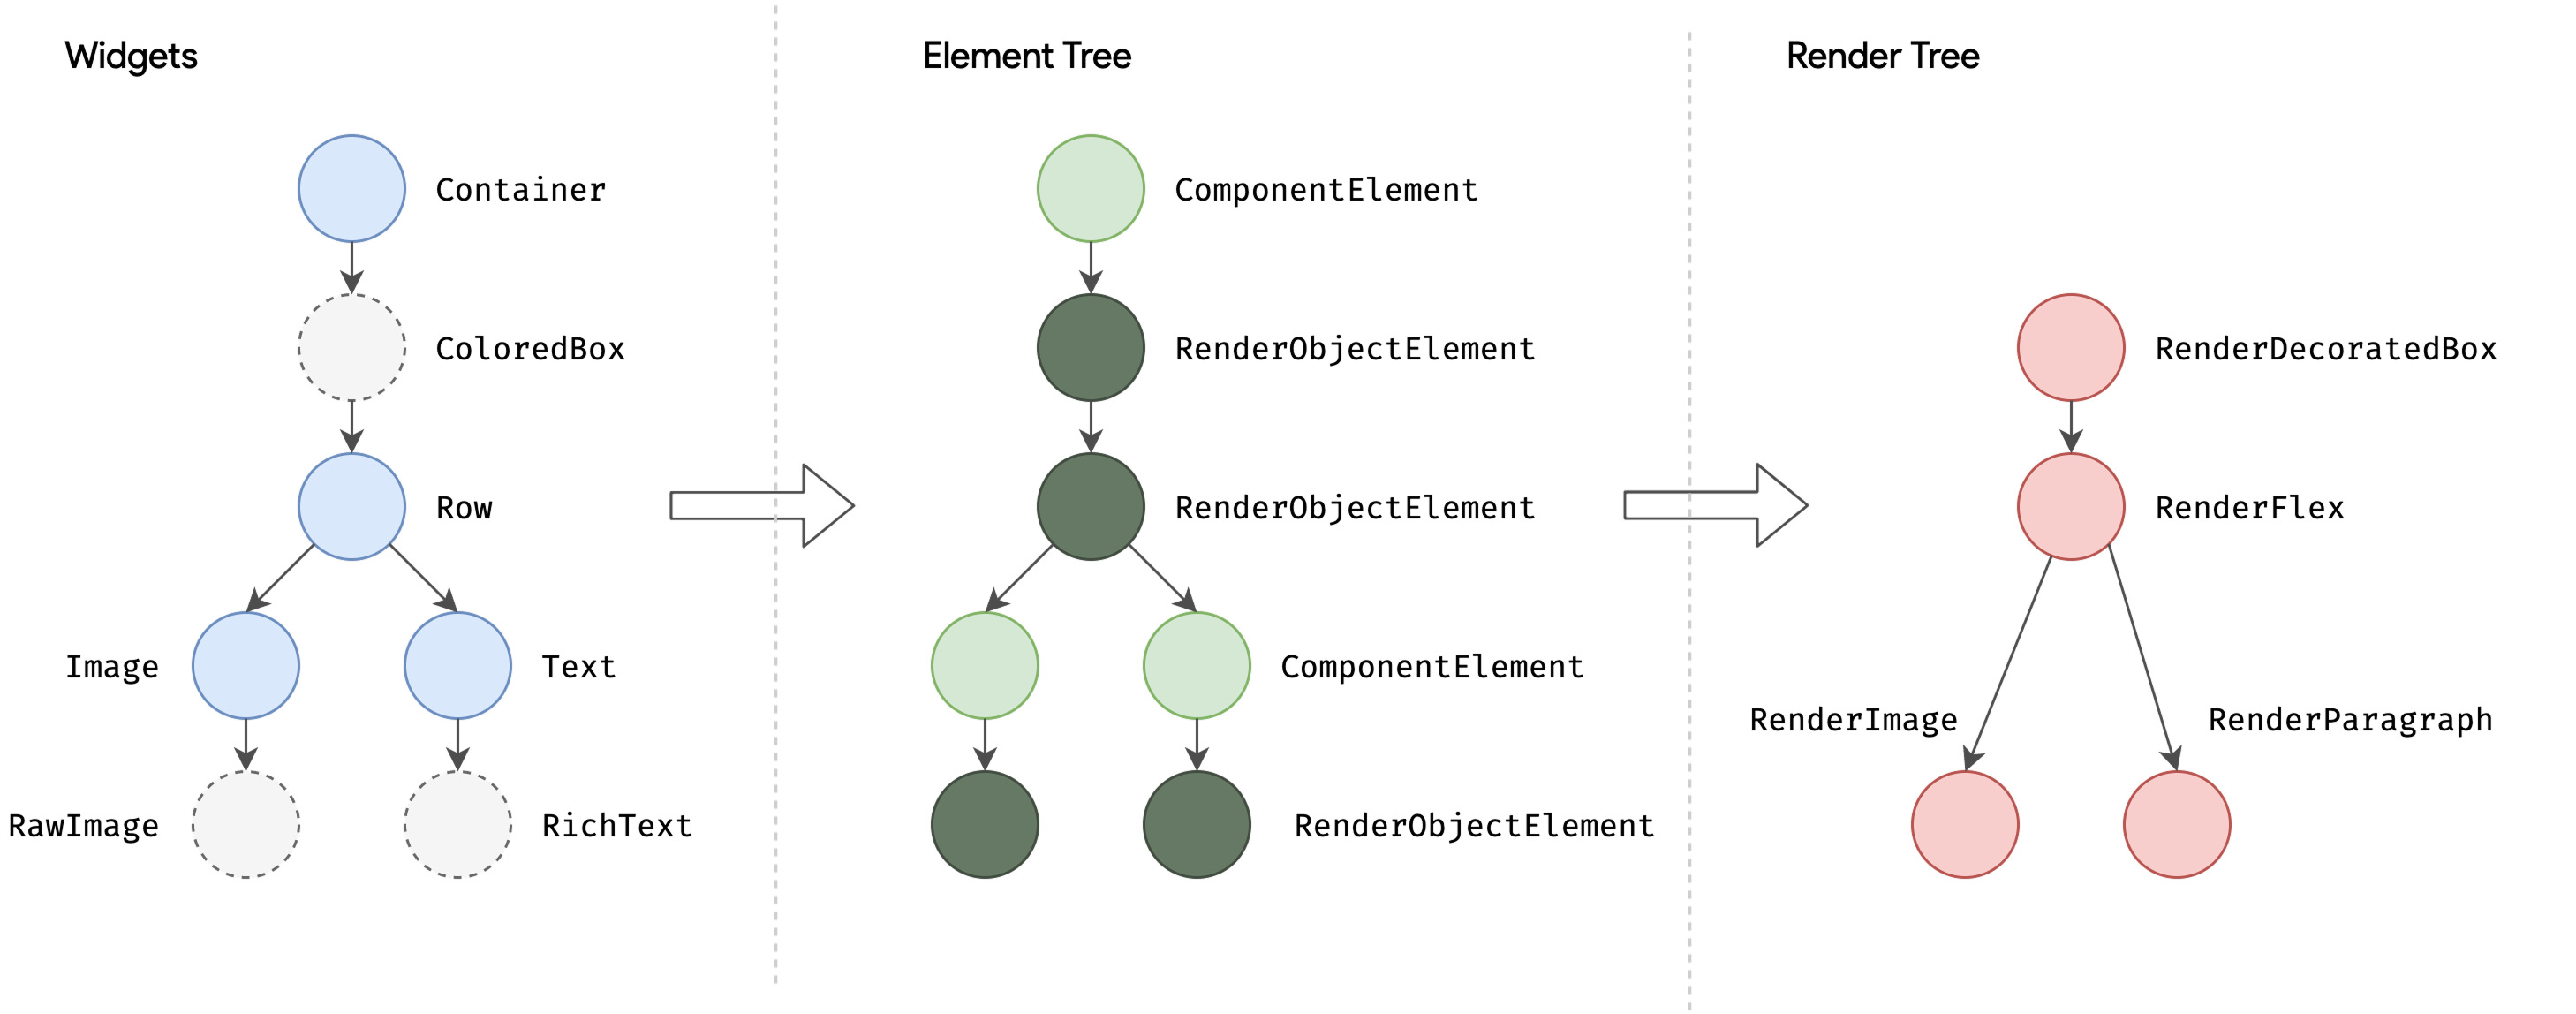
Render树刚好与Element树中RenderObjectElement结点对应。
顶级元素
三棵树的顶层元素是:
- 顶层
Widget:RootWidget - 顶层
Element:RootElement - 顶层
RenderObject:RenderView
顶级元素的创建--从runApp开始
创建RootWidget
从 runApp() 开始,先把我们写的app类(一般会在build()方法里return一个MaterialApp)包装在View类里面,
然后调用 WidgetsBinding 的 scheduleAttachRootWidget()方法。
dart
void runApp(Widget app) {
  final WidgetsBinding binding = WidgetsFlutterBinding.ensureInitialized();
  _runWidget(binding.wrapWithDefaultView(app), binding, 'runApp');
}
dart
void _runWidget(Widget app, WidgetsBinding binding, String debugEntryPoint) {
  assert(binding.debugCheckZone(debugEntryPoint));
  binding
    ..scheduleAttachRootWidget(app)
    ..scheduleWarmUpFrame();
}
接下来,在 WidgetsBinding 中,创建 RootWidget ,并绑定 BuildOwner 实例。
实际上,BuildOwner 是绑定到 RootElement 上的。
dart
  @protected
  void scheduleAttachRootWidget(Widget rootWidget) {
    Timer.run(() {
      attachRootWidget(rootWidget);
    });
  }
dart
  void attachRootWidget(Widget rootWidget) {
    attachToBuildOwner(RootWidget(debugShortDescription: '[root]', child: rootWidget));
  }
dart
  void attachToBuildOwner(RootWidget widget) {
    final bool isBootstrapFrame = rootElement == null;
    _readyToProduceFrames = true;
    _rootElement = widget.attach(buildOwner!, rootElement as RootElement?);
    if (isBootstrapFrame) {
      SchedulerBinding.instance.ensureVisualUpdate();
    }
  }
创建RootElement
调用链来到 RootWidget 类中,
在 attach() 方法中创建 RootElement 实例,即,调用 RootWidget 的 createElement()方法。
然后,绑定 BuildOwner。
dart
  RootElement attach(BuildOwner owner, [RootElement? element]) {
    if (element == null) {
      owner.lockState(() {
        element = createElement();
        assert(element != null);
        element!.assignOwner(owner);
      });
      owner.buildScope(element!, () {
        element!.mount(/* parent */ null, /* slot */ null);
      });
    } else {
      element._newWidget = this;
      element.markNeedsBuild();
    }
    return element!;
  }
维护Element树
最后,调用链来到 RootElement 类,调用了 mount() 方法,从顶层开始,递归创建整个 element tree。
注意,在 _rebuild() 方法中,调用了 updateChild() 方法,传递的参数中,传递了 RootWidget 的 child,递归的流程由此开始。
updateChild() 是一个模板方法,它是 element tree 维护更新的核心。
updateChild()的注释写着:Update the given child with the given new configuration.
dart
  @override
  void mount(Element? parent, Object? newSlot) {
    assert(parent == null); // We are the root!
    super.mount(parent, newSlot);
    _rebuild();
    assert(_child != null);
    super.performRebuild(); // clears the "dirty" flag
  }
dart
  void _rebuild() {
    try {
      _child = updateChild(_child, (widget as RootWidget).child, /* slot */ null);
    } catch (exception, stack) {
      final FlutterErrorDetails details = FlutterErrorDetails(
        exception: exception,
        stack: stack,
        library: 'widgets library',
        context: ErrorDescription('attaching to the render tree'),
      );
      FlutterError.reportError(details);
      // No error widget possible here since it wouldn't have a view to render into.
      _child = null;
    }
  }
创建RenderView
RenderView的创建时机,在runApp中,当WidgetsBinding准备好以后,就触发了,然后才是调用_runWidget()方法,去创建RootWidget、RootElement。
dart
void runApp(Widget app) {
  final WidgetsBinding binding = WidgetsFlutterBinding.ensureInitialized();
  _runWidget(binding.wrapWithDefaultView(app), binding, 'runApp');
}
dart
  Widget wrapWithDefaultView(Widget rootWidget) {
    return View(
      view: platformDispatcher.implicitView!,
      deprecatedDoNotUseWillBeRemovedWithoutNoticePipelineOwner: pipelineOwner,
      deprecatedDoNotUseWillBeRemovedWithoutNoticeRenderView: renderView,
      child: rootWidget,
    );
  }
dart
late final RenderView renderView = _ReusableRenderView(view: platformDispatcher.implicitView!);dart
class _ReusableRenderView extends RenderView {
  // ...
}所以,其实RenderView先于RootWidget和RootElement被创建,不过这不重要,因为我们优先关注RootWidget和RootElement。